import asyncio from mcp.types import AnyUrl from mcp.client.session import ClientSession from mcp.client.stdio import StdioServerParameters, stdio_client
asyncdefmain(): asyncwith stdio_client( StdioServerParameters(command="uv", args=["run", "mcp-simple-resource"]) ) as (read, write): asyncwith ClientSession(read, write) as session: await session.initialize()
# List available resources resources = await session.list_resources() print(resources)
# Get a specific resource resource = await session.read_resource(AnyUrl("file:///greeting.txt")) print(resource)
import asyncio from mcp.client.session import ClientSession from mcp.client.stdio import StdioServerParameters, stdio_client
asyncdefmain(): asyncwith stdio_client( StdioServerParameters(command="uv", args=["run", "mcp-simple-prompt"]) ) as (read, write): asyncwith ClientSession(read, write) as session: await session.initialize()
# List available prompts prompts = await session.list_prompts() print(prompts)
# Get the prompt with arguments prompt = await session.get_prompt( "simple", { "context": "User is a software developer", "topic": "Python async programming", }, ) print(prompt)
import asyncio from mcp.client.session import ClientSession from mcp.client.sse import sse_client
asyncdefmain(): asyncwith sse_client("http://localhost:8000/sse") as streams: asyncwith ClientSession(streams[0], streams[1]) as session: await session.initialize()
# List available prompts prompts = await session.list_prompts() print(prompts)
# Get the prompt with arguments prompt = await session.get_prompt( "simple", { "context": "User is a software developer", "topic": "Python async programming", }, ) print(prompt)
asyncio.run(main())
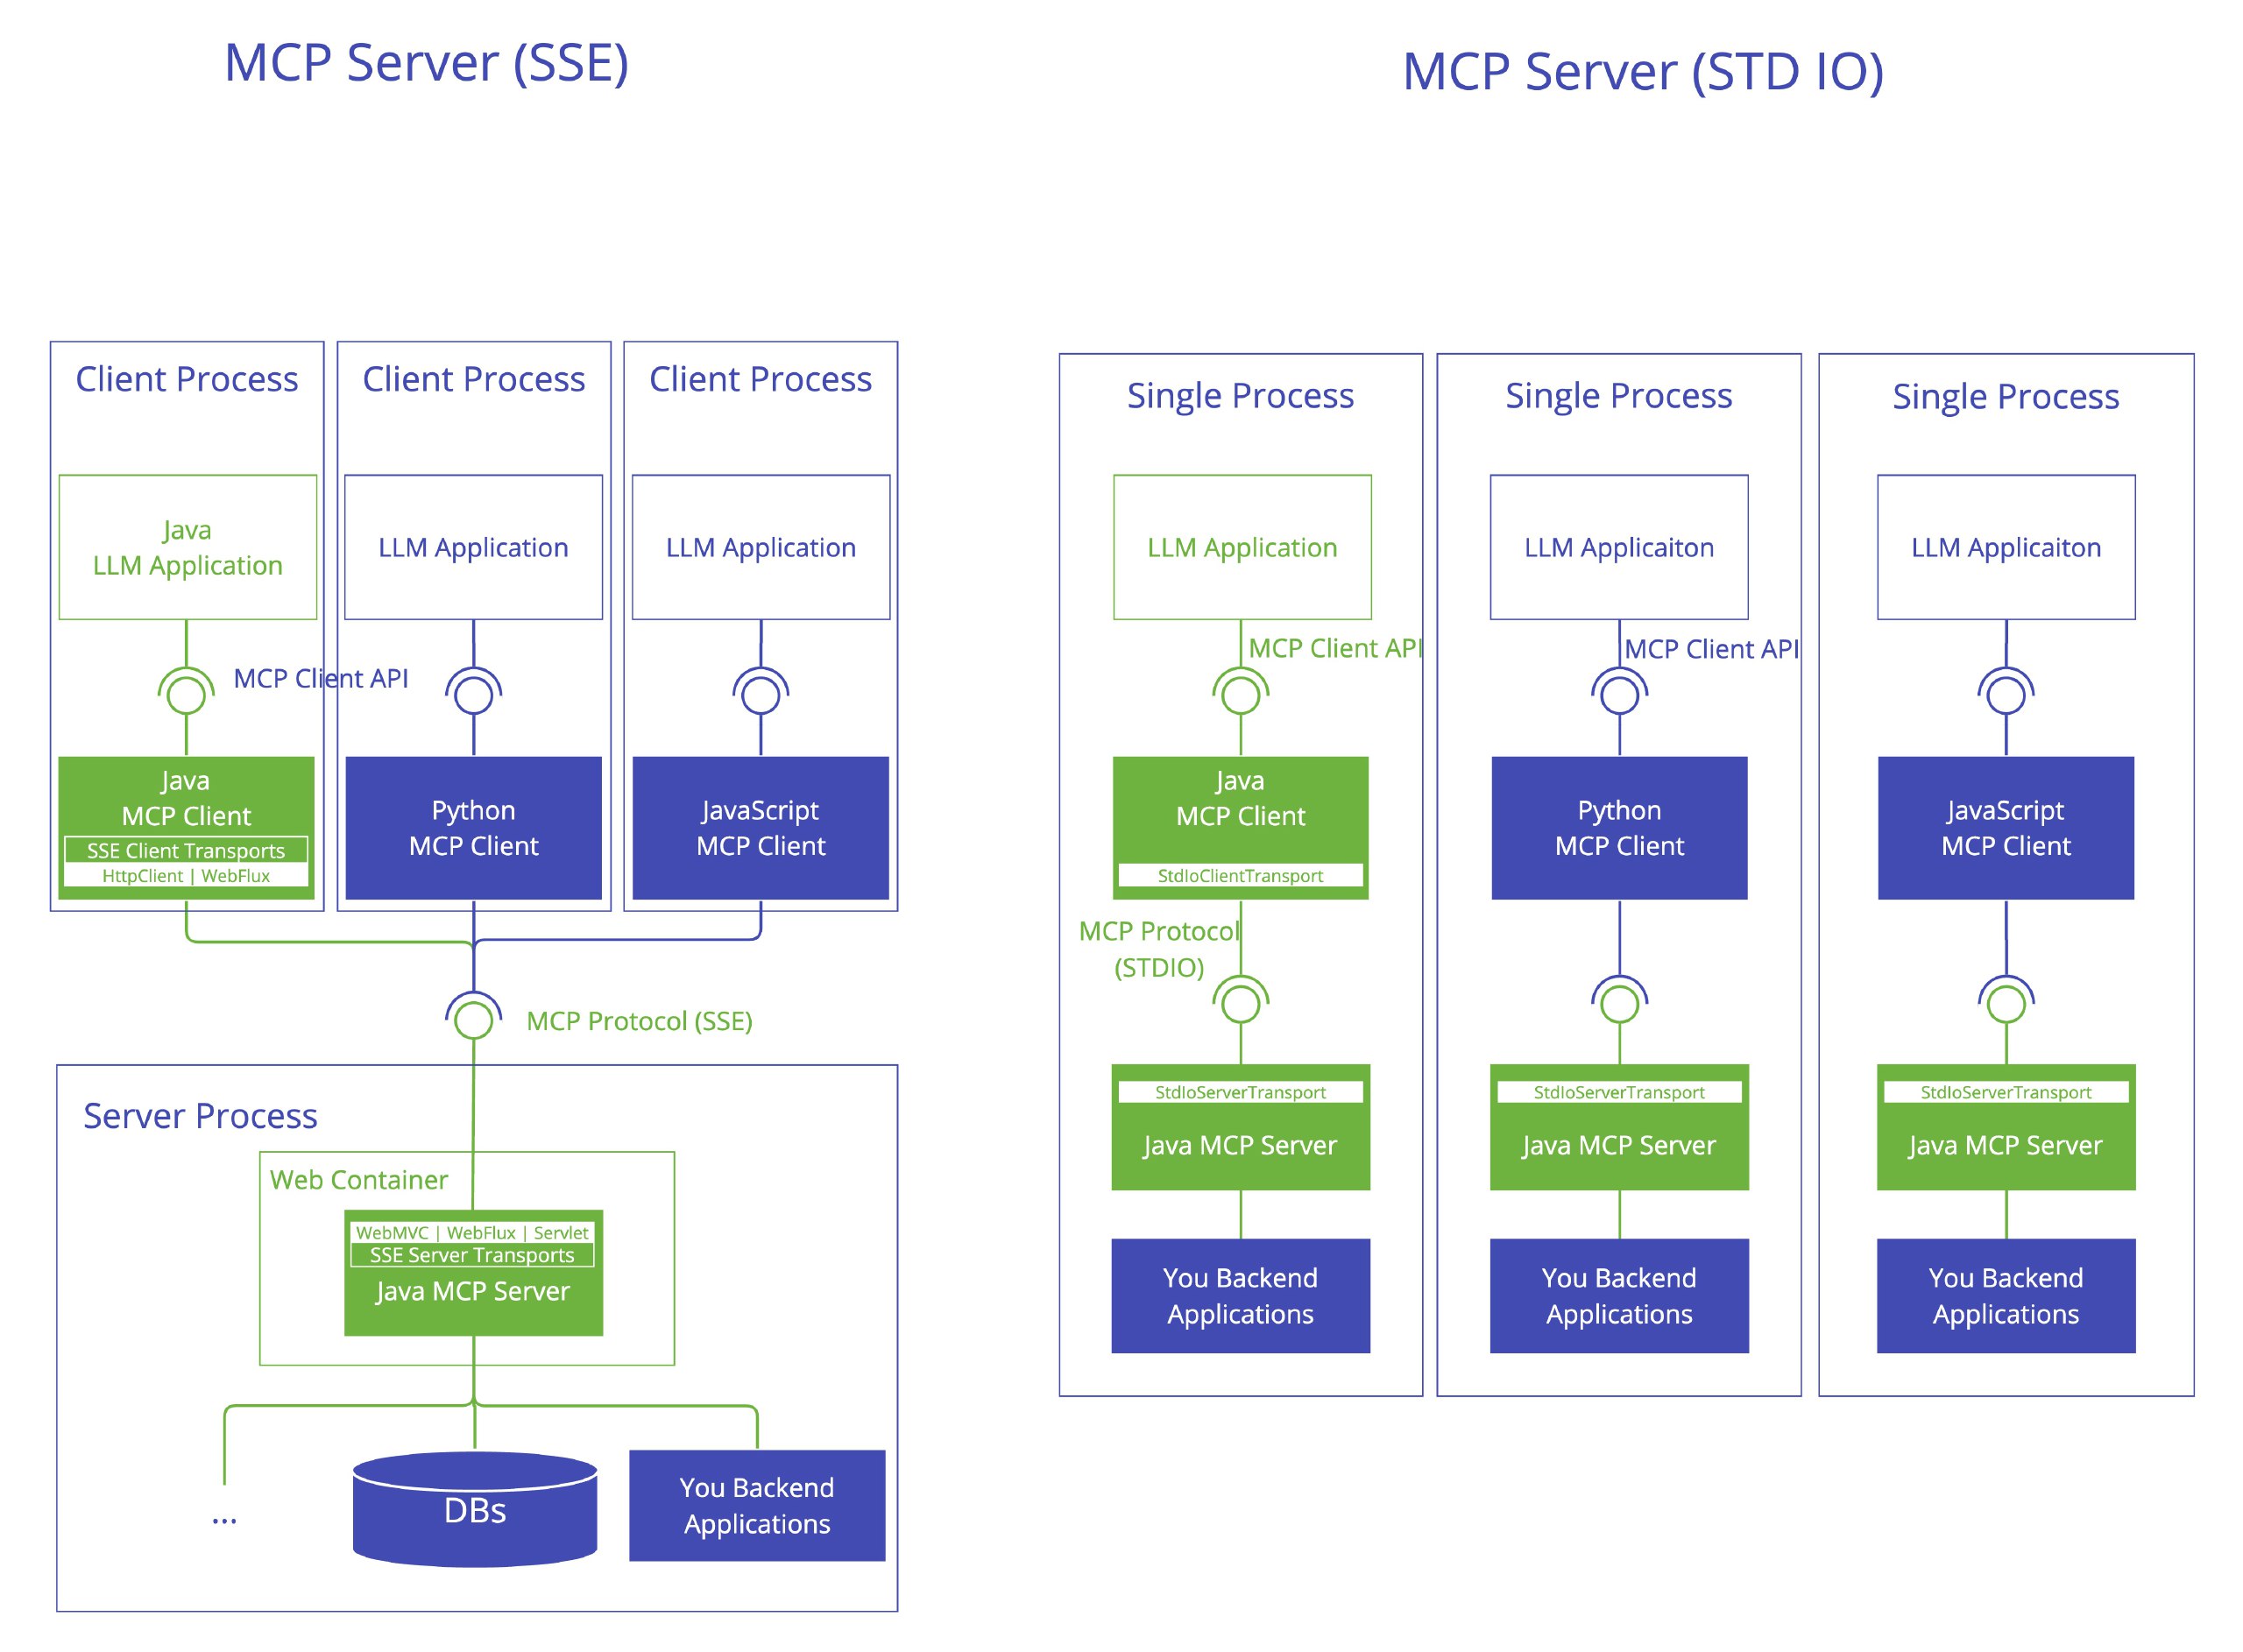
SSE方式,服务端和客户端为分别独立的进程,运行客户端之前需启动服务:
1
uv run mcp-simple-prompt --transport sse --port 8000
if transport == "ws": from mcp.server.websocket import websocket_server from starlette.applications import Starlette from starlette.endpoints import WebSocketEndpoint from starlette.routing import WebSocketRoute from starlette.websockets import WebSocket from hypercorn.asyncio import serve from hypercorn.config import Config import asyncio
# Define the endpoint class inside main to capture 'app' classMCPWebSocketEndpoint(WebSocketEndpoint): asyncdefon_connect(self, websocket: WebSocket) -> None: """Handles incoming WebSocket connections.""" # await websocket.accept() # 不能加这行代码、加了就会报错:RuntimeError: Expected ASGI message "websocket.connect", but got 'websocket.receive' logger.info("WebSocket connection accepted via Endpoint")
# Run MCP server within the connection scope try: print(f"================== WS Endpoint Connect =================={websocket}") # Create the MCP transport using the websocket's scope, receive, and send ws_transport = websocket_server(websocket.scope, websocket.receive, websocket.send) # The websocket_server is an async context manager that provides the streams asyncwith ws_transport as streams: # 'app' is captured from the outer 'main' scope await app.run( streams[0], streams[1], app.create_initialization_options() ) logger.info("MCP app.run finished for this WebSocket.") except Exception as e: # Log the error and re-raise to ensure Starlette handles disconnect logger.error(f"Error during MCP run in WebSocket: {e}", exc_info=True) # Note: Starlette's WebSocketEndpoint automatically handles sending a close frame on unhandled exceptions. raise finally: # Ensure disconnect is logged even if app.run exits normally logger.info(f"Exiting on_connect for WebSocket:{websocket}")
asyncdefon_receive(self, websocket: WebSocket, data: any) -> None: """Handles receiving data on the WebSocket.""" # The mcp.server.websocket.websocket_server should handle receiving messages internally. # This method might not be strictly necessary for the MCP logic itself, # but it's part of the WebSocketEndpoint interface. # If this gets called unexpectedly, it might indicate an issue. logger.warning(f"Endpoint on_receive called with data: {data} - This might indicate an issue if MCP transport should solely handle receives.") # We do not process data here; the transport handles it within app.run.
asyncdefon_disconnect(self, websocket: WebSocket, close_code: int) -> None: """Handles WebSocket disconnection.""" logger.info(f"WebSocket disconnected via Endpoint with code {close_code}") # Add any necessary cleanup logic here if needed.
starlette_app = Starlette(debug=True, routes=[ WebSocketRoute("/ws", endpoint=MCPWebSocketEndpoint) # Use the class directly ])
asyncdefrun_server(): logger.info(f"Starting WebSocket server on port {port} using Endpoint") await serve(starlette_app, config)
asyncio.run(run_server()) else: # Process using stdio transport import asyncio from mcp.server.stdio import stdio_server